
A Virtual Private Network is a technology solution used to provide privacy and security for inter-network connections. The most well-known case consists of people connecting to a remote server with traffic going through a public or insecure network (such as the Internet).
Picture the following scenarios:
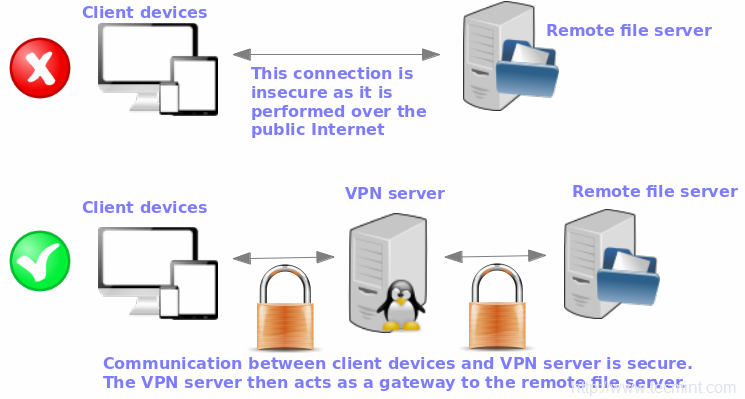
In this article, we will explain how to set up a VPN server in an RHEL 9 server using OpenVPN, a robust and highly flexible tunneling application that uses encryption, authentication, and certification features of the OpenSSL library.
For simplicity, we will only consider a case where the OpenVPN server acts as a secure Internet gateway for a client.
For this setup, we’ve used three machines, the first one acts as an OpenVPN server, and the other two (Linux and Windows) act as a client to connect to a remote OpenVPN Server.
Note: The same instructions also work on RHEL-based distributions such as AlmaLinux, Rocky Linux, and Fedora.
How to Install OpenVPN Server in RHEL 9
1. To install OpenVPN in an RHEL server, you will first have to enable the EPEL repository and then install the package, which comes with all the dependencies needed to install the OpenVPN package.
sudo dnf update
sudo dnf install https://dl.fedoraproject.org/pub/epel/epel-release-latest-9.noarch.rpm
2. Next, we will download OpenVPN’s installation script and set up the VPN. Before downloading and running the script, it’s important that you find your server’s Public IP address as this will come in handy when setting up the OpenVPN server.
An easy way to do that is to use the curl command as shown:
curl ifconfig.me
Alternatively, you can invoke the dig command as follows:
dig +short myip.opendns.com @resolver1.opendns.com

If you get into an error “dig: command not found” install the dig utility by running the command:
sudo dnf install bind-utils
This should resolve the problem.
A Note About Public IP Addresses
Cloud servers will usually have 2 types of IP addresses:
- A single Public IP address: If you have a VPS on Cloud platforms such as Linode or Digital Ocean, you will usually find a single Public IP address attached to it.
- A private IP address behind NAT with a public IP: This is the case with an EC2 instance on AWS or a compute instance on Google Cloud.
Whichever the IP addressing scheme, the OpenVPN script will automatically detect your VPS network setup and all you have to do is to provide the associated Public or Private IP address.
3. Now let’s proceed and download the OpenVPN installation script, and run the command shown.
wget https://raw.githubusercontent.com/Angristan/openvpn-install/master/openvpn-install.sh
4. When the download is complete, assign execute permissions and run the shell script as shown.
sudo chmod +x openvpn-install.sh
sudo ./openvpn-install.sh
The installer takes you through a series of prompts:
5. First, you will be prompted to provide your server’s public IP address. Thereafter, it’s recommended to go with the default options such as default port number (1194) and protocol to use (UDP).

6. Next, select the default DNS resolvers and select the No option ( n ) for both compression and encryption settings.

7. Once done, the script will initialize the setup of the OpenVPN server along with the installation of the other software packages and dependencies.

8. Lastly, a client configuration file will be generated using the easy-RSA package which is a command-line tool used for managing security certificates.
Simply provide the name of the client and go with the default selections. The client file will be stored in your home directory with a .ovpn file extension.
9. Once the script is done setting up the OpenVPN server and creating the client configuration file, a tunnel interface tun0 will be spawned. This is a virtual interface where all traffic from the client PC will be tunneled to the server.

10. Now, you can start and check the status of the OpenVPN server as shown.
sudo systemctl start [email protected]
sudo systemctl status [email protected]

How to Configure OpenVPN Client in Linux
11. Now head over to the client system and install the EPEL repository and OpenVPN software packages.
dnf install epel-release -y
dnf install openvpn -y
12. Once installed, you need to copy the client configuration file from the OpenVPN server to your client system. You can do this using the scp command as shown
scp -r [email protected]:/home/ravi/tecmint01.ovpn .

13. Once the client file is downloaded to your Linux system, you can now initialize a connection to the VPN server, using the command:
sudo openvpn --config tecmint01.ovpn
You will get output similar to what we have below.

14. A new routing table is created and a connection is established with the VPN server. Again, a virtual interface tunnel interface tun0 is created on the client system.
As mentioned earlier, this is the interface that will tunnel all traffic securely to the OpenVPN server via an SSL tunnel.
The interface is assigned an IP address dynamically by the VPN server. As you can see, our client Linux system has been assigned an IP address of 10.8.0.2 by the OpenVPN server.
ifconfig

15. Just to be certain that we are connected to the OpenVPN server, we are going to verify the public IP.
curl ifconfig.me
And voila! our client system has picked the VPN’s public IP confirming that indeed we are connected to the OpenVPN server.
Alternatively, you can fire up your browser and Google search “What is my IP address” to confirm that your public IP has changed to that of the OpenVPN server.
How to Configure OpenVPN Client on Windows
16. On Windows, you will need to download the official OpenVPN Community Edition binaries that come with a GUI.
17. Next, download your .ovpn configuration file into the C:Program FilesOpenVPNconfig directory and as an Administrator, start OpenVPN GUI from Start –> All programs –> OpenVPN, and it will be launched in the background.
18. Now fire up a browser and open http://whatismyip.org/ and you should see the IP of your OpenVPN server instead of the public IP provided by your ISP:
Summary
In this article, we have explained how to set up and configure a VPN server using OpenVPN, and how to set up two remote clients (a Linux box and a Windows machine).
You can now use this server as a VPN gateway to secure your web browsing activities. With a little extra effort (and another remote server available) you can also set up a secure file/database server, to name a few examples.
Recommended VPN Services
If you prefer a ready-made solution or don’t want to manage your own server, consider using a professional VPN service as follows:
- ExpressVPN: Known for its high-speed servers and strong encryption.
- NordVPN: Offers robust security features and a no-logs policy.
- ProtonVPN: Focuses on privacy and has a free plan.
We look forward to hearing from you, so feel free to drop us a note using the form below. Comments, suggestions, and questions about this article are most welcome.
![How to Install WordPress on Docker in 2024 [Step-By-Step Guide]](https://massive.news/wp-content/webp-express/webp-images/uploads/2024/09/how-to-install-wordpress-on-docker-in-2024-step-by-step-guide-6.png.webp)


