vSphere Replication is the product of VMware which provides the replication functionality for the virtual machines. Where you can protect your virtual machines from failure by replicating to the same or different data centers. In this post, we will see How to Install vSphere Replication 8 Step by Step.
vSphere Replication is a free-to-use product from VMware that works with vCenter Server to provide hypervisor-based replication for virtual machines. It is an alternative to storage-based replication which protects virtual machines running in the vSphere Infrastructure from failure.
So how does vSphere Replication work:
When you configure a VM for replication, the vSphere Replication agent sends changed blocks in the virtual machine disks from the source site to the target site. The changed blocks are applied to the copy of the virtual machine at the target site. This process occurs independently of the storage layer. vSphere Replication performs an initial full synchronization of the source virtual machine and its replica copy. You can use replication seeds to reduce the network traffic that data transfer generates during the initial full synchronization. You can set a recovery point objective (RPO) and enable the retention of instances from multiple points in time (MPIT) for the virtual machines that are being replicated.
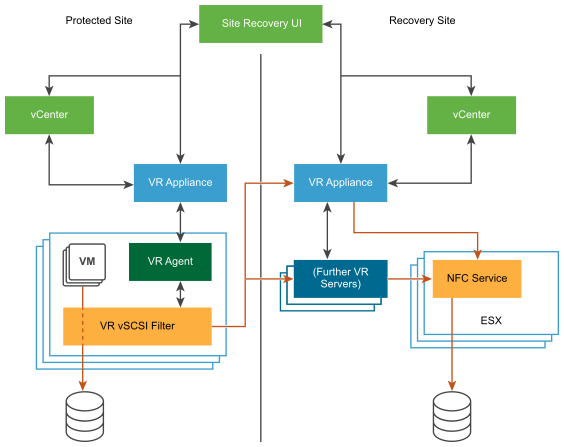
Below you can see the sample architecture from VMware Documentation:

As you can see you have to install VR Appliance at source & target site so that you can protect your virtual machines by replication. It doesn’t have any dependency on the datastore storage type it can be of any iSCSI, NFS, SAN etc.
So let’s see How to Install vSphere Replication 8 Step by Step:
Download the vSphere Replication Appliance from VMware Portal.
You will get the ISO file of appliance.
Mount the ISO to CD/DVD.
Step 1:
Login to vCenter Server.
Select Host or Cluster where you want to deploy vSphere Replication Appliance.
Right click > Deploy OVF Template.

Step 2:
OVF Deployment wizard will start.
You can deploy OVF by 2 ways URL or Local files.
It is always better to deploy via Local files.
Click Upload files.

Select the vSphere Replication Appliance files from the mounted ISO.

Step 3:
Set the name & location for the vSphere Replication Appliance.

Step 4:
Select the cluster or host for Deployment of vSphere Replication.

Step 5:
You will get the details about the vSphere Replication Appliance.
Click Next to continue.

Step 6:
Read & Accept the license agreement.

Step 7:
Select the storage for installation of vSphere Replication appliance.

Step 8:
Select the network for vSphere Replication.

Step 9:
Set the password for root & admin account.
Configure networking for the vSphere Replication Appliance such as IP Address, Gateway etc.

Step 10:
Review all the configuration & click Finish to start installation of vSphere Replication Appliance.

It may take few minutes for complete deployment according to your vSphere Environment. Once it is deployed successfully you can power on the Appliance.
That’s it for Today Friends. I Hope you liked reading this post & If you find anything more to be added or removed feel free to write it in our comments. If you find it useful You are Feel free to share this on social media to help others & spread knowledge.
If you have any queries on anything you are free to write them in our comments section & we will make sure to provide you with a better solution as soon as possible.
Follow us on Twitter for Regular updates: Mastering VMware
Join Our LinkedIn Group to get Updates and discussions: Mastering VMware.
Check out our Facebook Group for discussions & more.
You can also Like and share our Facebook Page for the Latest Updates.
